
Managing Windows 8 Networking
By: Arie Slob
If you are using the HomeGroup functionality for your network and file sharing needs you probably won't find much information in this article. If you want to know how to setup or join a HomeGroup, have a look at this article on Microsoft's web site: HomeGroup from start to finish.
In this article I will look at the 'traditional' way of sharing files / configuring your network. Doing it this way gives you more flexibility. If you have computers not running Windows 7 or Windows 8, you can't use the HomeGroup functionality to share files/folders/resources with these latest Microsoft operating systems, as HomeGroup functionality was only added to Windows from Windows 7 onward.
To start you should set up all your computers with a password protected user account. Yes, I know... you are the only user, so why use a password, right? Well, Windows 8 (and Windows 7 for that matter) uses more strict controls so you should have a user account & password on all your systems. Yes, for convenience you can use one and the same user account/password on all your systems. If a system is used by another family member, you will be accessing the system with your own credentials.

Once you have set a password on your user account, there is an easy way to work around the requirement to type in your password at every startup.
In the Run box (Winkey + R) type control userpasswords2, select your username & uncheck the checkbox in front of Users must enter a user name and password to use the computer. You'll be prompted to enter the current password, and once saved, Windows will now log you into that user account automatically. This command is available in any Windows version.
You'll have to enter the current password for your account to enable/disable this functionality.
Note that the above command will only function when run from an account with Administrator privileges (not from a Standard account).
Yes, I know, there is something to be said that setting your computer to automatically log on to a user account could pose a security risk if you share your computer with other users, or if other people could easily gain physical access to your computer. If your computer logs on automatically, anyone will have the same access as the user account you have set to be automatically logged in to at start up (or resume). But like many users, I don't need this on my home computer. Just make sure you understand the implications.
Please note that if you are running a 3rd party firewall, you'll have to allow file & printer sharing. Consult your firewall's documentation to check out which changes you'll need to make. If you're using Windows Firewall, you don't have to make any manual changes, because Windows Firewall automatically uses the correct settings for file and printer sharing when you share something or turn on network sharing.
These are the ports that you'll need to open to find other PCs and to use file and printer sharing on your Windows network:
- UDP 137
- UDP 138
- TCP 139
- TCP 445
- UDP 5355
To be able to find network devices, you'll have to open these ports:
- UDP 1900
- UDP 3702
- UDP 5355
- TCP 2869
- TCP 5357
- TCP 5358
If you also have a homegroup on your network, in adittion to the ports listed above you'll also have to open these ports:
- UDP 3540
- TCP 3587
Next make sure the workgroup name is the same on all the computers on your network. Remember that the default workgroup name is not the same in all Windows operating systems. You can change the workgroup name by opening the System Properties (Windows key + R) type Sysdm.cpl in the Open box and click OK. Click the Change button next to To rename this computer or change its domain or workgroup, click Change (Figure) 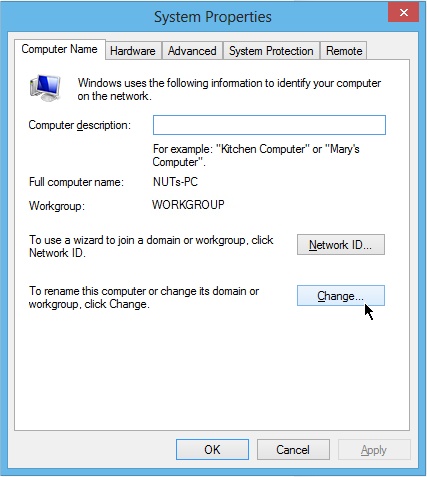 . Windows will prompt you to reboot to complete the change.
Next, check the network location to make sure it's set to Private network (Figure) 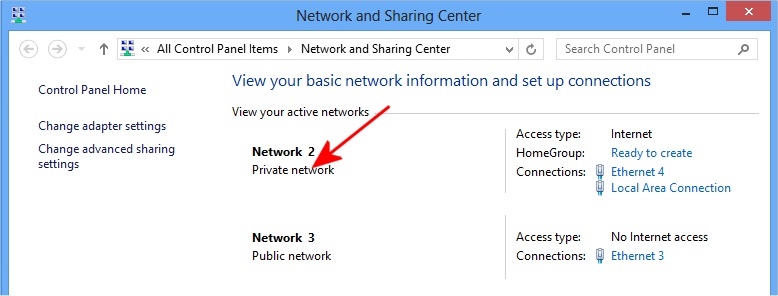 . To do this: press the Windows Key + W and type Network and Sharing Center in the Search box and press the Enter key. If Network is set to Public network, you'll have to change it. Left-click the network icon in your system tray (Figure)
  and
on the new network list menu, right-click the network you want to change, then click Turn Sharing on or off (Figure)
and
on the new network list menu, right-click the network you want to change, then click Turn Sharing on or off (Figure) 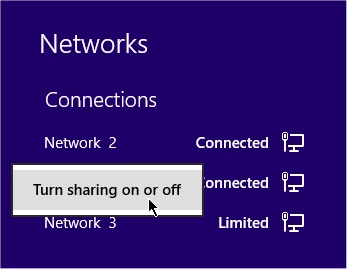 . Select your desired option. For a private network you'll have to choose Yes, turn on sharing and connect to devices (Figure)
 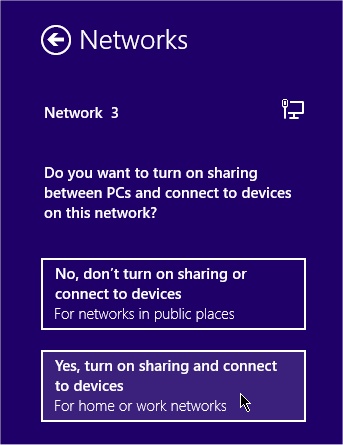 .
.
Please note: If you are connected to a public (WiFi) network, changing your network to Private could pose a security risk because it allows other people on the network to see your computer on the network.
Next click the Change advanced sharing settings link on the left side of the Network and Sharing Center, and check that you have the following settings:
Private (Figure) 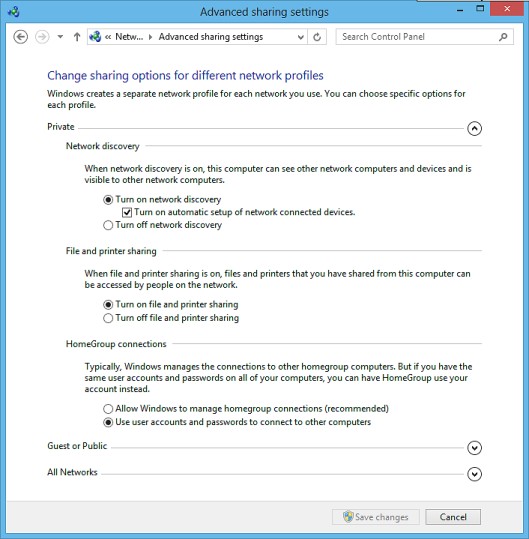 :
:
- Network discovery: ON
- Turn on automatic setup of network connected devices: Checked
- File and printer sharing: ON
- HomeGroup connections: Use user accounts and passwords to connect to other computers
All Networks (Figure) 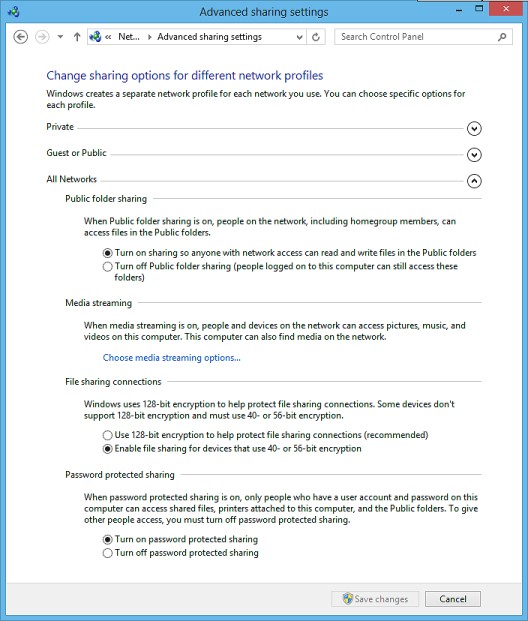 :
:
- Public folder sharing: ON
- Media streaming: to your individual choice
- File sharing connections: Enable 40- or 56-bit encryption
- Password protected sharing: ON
Another option I've had a lot of success with is adding the User name and Password of other PC's on the network to the Windows 8 Credentials Store.
Press the Windows Key + W and type credentials in the Search box and click the item Manage Windows credentials (Figure) 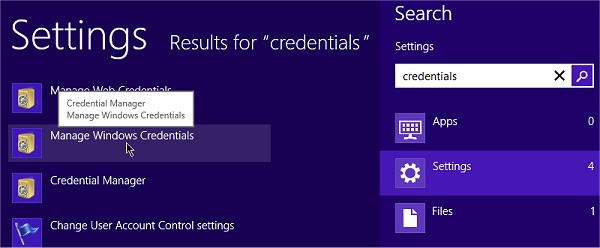 . Next to Windows Credentials click the Add a Windows credential (Figure)
 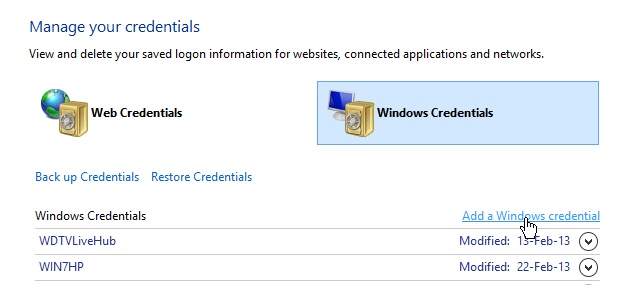 .
.
Type the computer name of the other computer you want to reach (for example \\PC2), add the User name and Password (of the computer concerned) (Figure) 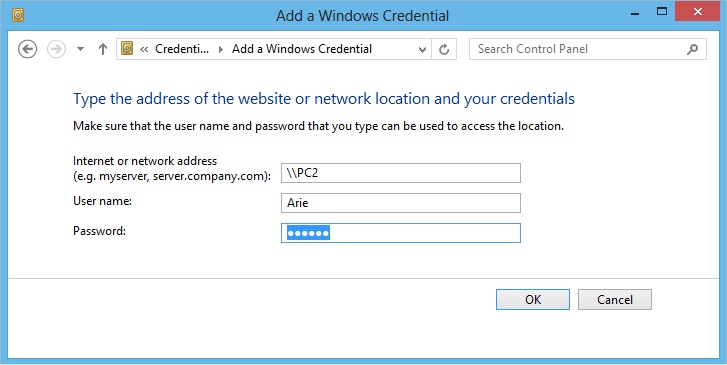 , now try connecting again.
Note: You can find a computer's name by launching the System applet from Control Panel. For Windows XP there's a separate tab Computer Name, on Windows Vista and later the Computer Name is listed on the main window when you open the System applet (Figure) 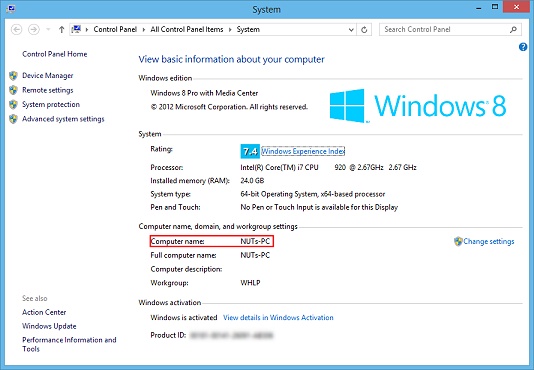 .
.
On page 2 of this article I will look at some wireless networking settings and issues.