
Adjust Vista's System Protection
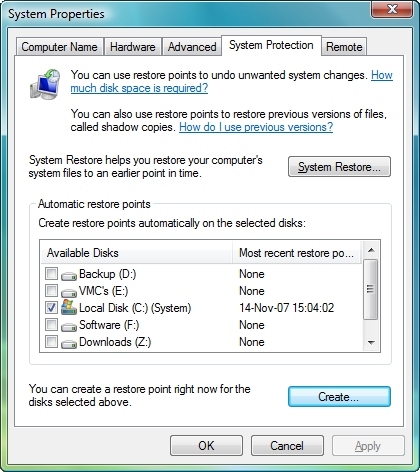
By: Arie SlobWindows Vista - like Windows Me and Windows XP - includes System Restore (now part of Vista's System Protection) (Figure), that automatically backs up registry and system files whenever you install new software or drivers.
System Restore enables you to restore your computer to an earlier state without losing (user) data. You would typically use System Restore if your computer is not operating well because of a configuration change, a problem with a new software installation, or other problems that make your computer behave erratically. By restoring your computer to an earlier (restore) point (from a date prior to your computer starting to display problems), you may be able to easily resolve the problem. System Restore automatically creates easily identifiable restore points, and can also create your own manually if you want.
Note: You should realize that software which has been installed since the restore point was made (the point back in time you are restoring your computer to) will be removed.
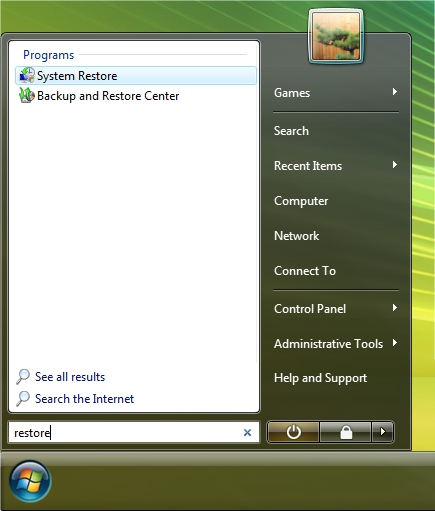
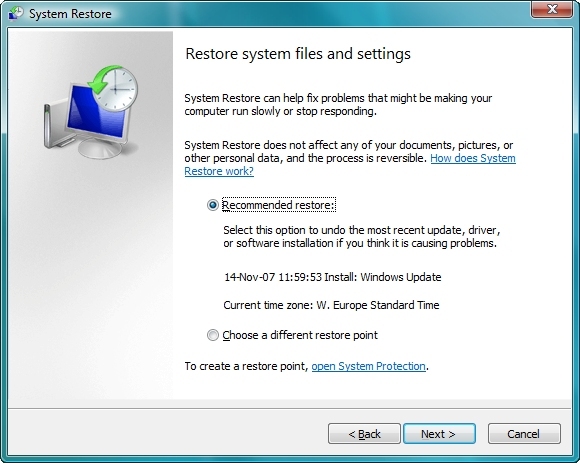
You can access System Restore in various ways, but one of the fastest ways (to find anything on your computer) is by typing restore in the Start Search box on Vista's Start menu, which will list a shortcut to system restore on Vista's menu (Figure). From here you can either choose to restore your computer to a previous restore point, or to create a new restore point. In Vista, the last restore will always be offered as a Recommended restore, but you can also choose your own by clicking Choose a different restore point.
If you can't even get into windows, you can boot off Vista's installation DvD, and choose the Repair your computer option on the lower left hand side on the menu. This will let you choose System Restore from the System Recovery dialog. After a little while you will see the same screen to choose a restore point that you would see when you would start system restore from Windows.
Shadow Copy

If you have the Business, Enterprise or Ultimate version of Windows Vista, System Protection also includes Windows Shadow Copy, a service that automatically creates backup copies of files as you work, so you can quickly and easily retrieve versions of a document you may have accidentally deleted or you overwrote with incorrect data. Shadow copy is automatically turned on and creates copies on a scheduled basis of files that have changed. By only saving the incremental changes, disk space usage is kept to a minimum. Shadow Copy is integrated into System Restore; if System Restore is disabled you will not be able to use Shadow Copy.
To use Shadow Copy to restore a particular file to a previous state you would right-click on the file and select the Restore previous versions option. When you select a version from the list you have three options:
- You can open the previous version by clicking on the Open button. This allows you to view the contents of the file without overwriting your existing one
- If you would like to copy the older version to a new location you can click on the Copy button
- If you would like to restore the previous version, and overwrite the existing one, you can click on the Restore button
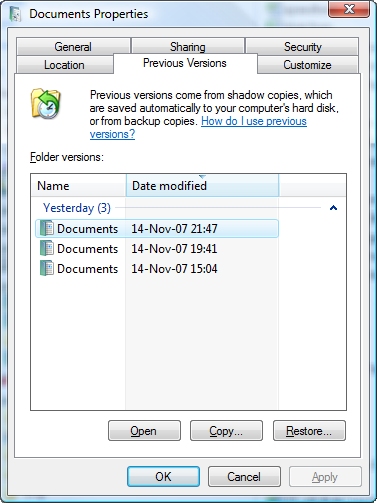
You can also use this feature to restore folders (and all of its contents) that were deleted. Here is how to do it:
- When in the folder that you would like to restore, click the Organize drop-down on the menu, and then select Properties
- Select the Previous Versions tab
- Select the date of the Shadow Copy you would like to restore and then select one of the options (Open, Copy, or Restore) as required (Figure)
If you only wish to restore a particular file (or sub-folder) from within a folder Shadow Copy, select the Open option to open the Shadow Copy of the folder and then copy the files out of the opened Shadow Copy.
Hard Disk Space Usage
If you have used Windows XP's system restore, you probably know that you could change the amount of disk space reserved for your restore points (if not, read this HelpWithWindows article). Like its predecessor, Vista uses 15% of a hard drive's space (for hard drives over 1GB) for system restore storage. In Windows Vista the space used for System Restore and Shadow Copy can't be configured from within the Graphical User Interface (GUI). But there is a command-line utility that you can use for this purpose. To see how much space is currently allocated on your system, open an elevated command prompt:
Click Vista's Start button, and in the Start Search box type cmd. At the top of the Start menu (under the Programs header), you will see cmd.exe listed; right-click this entry, and from the context menu click Run as administrator (Figure) (you can also press the Ctrl+Shift+Enter keys simultaneously after you typed cmd in Vista's Start Search box, this will also get you an elevation prompt to run cmd.exe in administrator mode).
The command vssadmin list shadowstorage will show you the amount of space that is in use by the shadow copy storage space, as well as the space that has been allocated and the maximum space that could be used by the shadow copy storage.

My "C" drive is 40GB, and as you can see, 15% (or 6GB) could be the maximum space used by the shadow copy storage. You can use the following command to limit the size of the shadow copy storage:
vssadmin resize shadowstorage /on=[OnVolumeSpec:] /for=[ForVolumeSpec:] /maxsize=[MaxSizeSpec]
Where:
- OnVolumeSpec: is the drive letter, in this example C
- ForVolumeSpec: is the drive letter, in this example C
- MaxSizeSpec: is the maximum size you want System Restore to use, in this example 1.5G
example: vssadmin resize shadowstorage /On=C: /For=C: /Maxsize=1.5G
MaxSizeSpec must be 300MB or greater and accepts the following suffixes: KB, MB, GB, TB, PB and EB. Also, B, K, M, G, T, P, and E are acceptable suffixes. If a suffix is not supplied, MaxSizeSpec is in bytes.
Note: when you decrease the space allocated to the shadow copy storage below the current value that is in use, you will lose all your system restore points and shadow copies.
Dual-booting Vista with Windows XP or Server 2003
If you have a dual-boot configuration and you start an earlier version of Windows (XP or 2003), the earlier Windows version will delete any restore points created by Windows Vista. The earlier operating system also deletes all Complete PC Backup files except the most recent version of these backup files.
In Microsoft Knowledge Base Article 926185 Microsoft offers two work-arounds:
- Use Bitblocker on the Vista Volume. Bitblocker is only available in the Enterprise and Ultimate additions of Windows Vista. When Windows XP or Windows Server 2003 starts, the Windows Vista volume on which the Bitlocker feature is enabled is inaccessible. Therefore, the Windows Vista restore points remain intact.
- Add the following registry key to Windows XP:
- Start the Registry Editor
- Go to HKEY_LOCAL_MACHINE \ SYSTEM \ MountedDevices \ Offline
If the Offline registry subkey does not exist, you must manually create this registry subkey. With HKEY_LOCAL_MACHINE \ SYSTEM \ MountedDevices selected, from the Menu choose Edit > New > Key and name the subkey Offline. - From the menu, select Edit > New > DWORD (32-bit) Value
- Name the new value \DosDevices\D:
- Double-click this new value, and enter 1 as its Value data
- If you have Vista installed on a partition other than D, change the \DosDevices\D: value to the partition letter on which Vista is installed.
Give your comments on this article.