
How to Network Windows 7 With Other Windows Versions (p2)
By: Arie SlobWindows XP
On Windows XP you should run the Network Setup Wizard. This can be found from Control Panel > Network and Internet Connections. When prompted for a Computer Description and Name, you can leave the description empty, but you have to give each computer on your network an individual name. When prompted for your Network Name, make sure you sync this with other computers on your network. I suggest choosing a unique name, not one of Microsoft's defaults. On the next screen select Turn on File and Printer sharing. After the wizard finishes, select the last option to Just finish the wizard...
Windows Vista
 Make sure the Workgroup name is set the same as the other computers on your network. You can check & access your Workgroup name by going to Start > Control Panel > System and Maintenance and clicking on System. Next to the Computer name, domain, and workgroup settings is a Change settings link that will allow you to change the workgroup name if needed.
Next, check the network location to make sure it's set to Private. To do this: open Control Panel > Network and Internet and click Network and Sharing Center. If Network is not set to Private Network, click the Customize link and select the Private option.
The final step is to turn on file sharing, public folder sharing, and printer sharing. From the Network and Sharing Center, click the chevron next to File sharing and select Turn on File sharing. Next click the chevron next to Public folder sharing, and select one of the two options to turn on sharing. Lastly (if applicable) click the chevron next to Printer sharing and click Turn on printer sharing.
Windows 7
Make sure the Workgroup name is set the same as the other computers on your network. You can check & access your Workgroup name by going to Start > Control Panel > System and Security and clicking on System. Next to the Computer name, domain, and workgroup settings is a Change settings link that will allow you to change the workgroup name if needed.
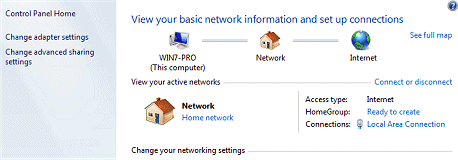
Next, check the network location to make sure it's set to Home network (or Work network). To do this: Open Control Panel > Network and Internet and click Network and Sharing Center. If Network is set to Public network, click the link and select the Home network (or Work network) option. No, there's no difference between the Home & Work setting.
Please note: You should only change a network to Home or Work if you are connected to a known and trusted network, such as your home or small business network. If you are connected to a public (WiFi) network, changing your network to Home or Work could pose a security risk because it allows other people on the network to see your computer on the network.
Next click the Change advanced sharing settings link on the left side of the Network and Sharing Center, and check that you have the following settings (under current profile):
- Network discovery: ON
- File and printer sharing: ON
- Public folder sharing: ON
- Media streaming: to your individual choice
- File sharing connections: Enable 40- or 56-bit encryption
- Password protected sharing: ON
- HomeGroup connections: Use user accounts and passwords
Another option I've had a lot of success with is adding the User name and Password of other PC's on the network to the Windows 7 Credentials Store.
In Windows 7 Start menu search box type credentials and launch the Control Panel item Manage Windows credentials (Figure) 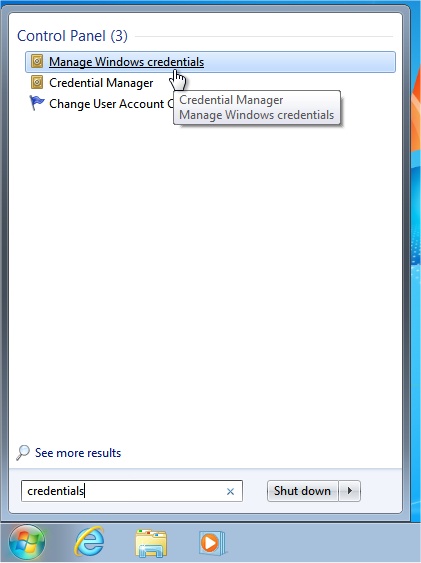 . Next to Windows Credentials click the Add a Windows credential (Figure)
 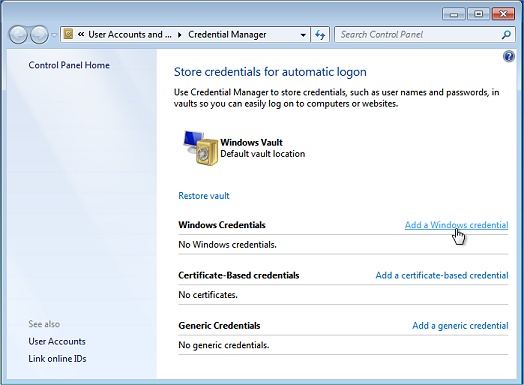 .
.
Type the computer name of the other computer you want to reach (for example \\PC2), add the User name and Password (of the computer concerned) (Figure) 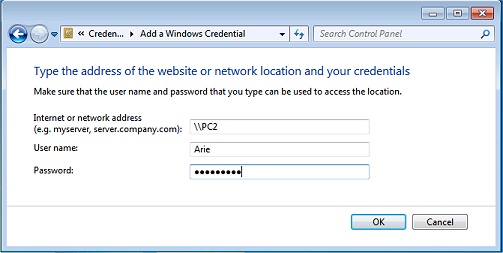 , now try connecting again.
Note: You can find a computers name by launching the System applet from Control Panel. For Windows XP there's a separate tab Computer Name, on Windows Vista and later the Computer Name is listed on the main window when you open the System applet (Figure) 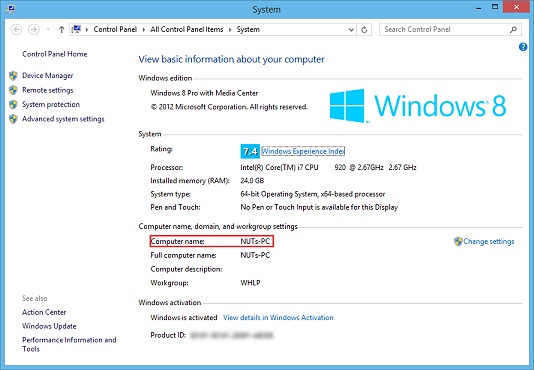 .
.
If you continue to have problems with your network, you should post a message on our Networking forum.