Windows 7: Optimize Windows 7 for use with a Solid State Drive (SSD) (page 2)
By: Arie SlobWindows Settings
The first item we need to check is to make sure your SSD isn't scheduled for disk defragmentation. Windows 7 will automatically disable scheduled defragmentation when it detects it is installed on an SSD drive. Disk defragmentation is unnecessary on an SSD drive and can even have a negative effect on the endurance of the drive.
What is confusing is that if you look at the Disk Defrag tool, it will show you that Scheduled defragmentation is turned on, but in the current status Window you'll see that Last Run will list Never.
To check and see if Windows identified your SSD drive as such, do the following:
- Open Disk Defragmenter
- Click the Configure schedule button
- Click the Select disks button
If you see an empty window with only (Select all disks) it means that your SDD was properly detected and the disk defrag tool won't be running on the disk. If you have multiple disk drives, you should see the (Select all disks) and any/all of your non SDD drives selected (Figure)  .
.
According to Microsoft, if the system disk is an SSD, and the SSD performs adequately on random reads and doesn't have glaring performance issues with random writes or flushes, then Superfetch, boot prefetching, application launch prefetching, and ReadyDrive will all be disabled. These technologies were all designed to improve performance on traditional HDDs, where random read performance could easily be a major bottleneck.
Initially, Microsoft had configured all of these features to be off on all SSDs, but reportedly they encountered sizable performance regressions on some systems. Looking for root causes Microsoft engineers found that some first generation SSDs had severe enough random write and flush problems that ultimately lead to disk reads being blocked for long periods of time. With Superfetch and other prefetching re-enabled, performance on key scenarios was markedly improved.
In summary, the options mentioned above perform the following:
- Windows SuperFetch, an innovative memory manager service that analyzes usage patterns over time to optimize memory content.
- Windows ReadyBoot, decreases the time it takes to boot a PC by preloading into cache the files and startup programs that are needed on the machine. (Boot time is the time it takes to reach the log-on screen after turning on the power.)
- Windows ReadyDrive, a feature that supports the use of hybrid hard disk drives (H-HDDs) on Windows systems.
In Windows 7 there is one service responsible for all the above functions: the Superfetch service. According to Microsoft if SuperFetch detects that the system drive is a fast SSD (as measured by Windows Experience Index (WEI) Disk score), then SuperFetch turns off ReadyBoot, ReadyBoost, and the SuperFetch service itself. According to Microsoft documentation, better SSDs can score above 6.5 all the way to 7.9. To be included in that range, an SSD has to have outstanding random read rates and be resilient to flush and random write workloads.
I have done several clean installations on both an older (2007) Dell D820 laptop and my (homebuilt) desktop PC (which is based on an Asus P6T WS PRO motherboard) and noted that the Superfetch service wasn't disabled, even after several restarts (the WEI assessment tool listed Disk Score: 7.8). To double-check I checked the registry, which confirmed that both Prefetch and Superfetch were set to run.
To manually check the Superfetch service status, type services.msc in your Start menu search box and press enter. Check that the service Superfetch is set to Disabled.
You can run the Windows Experience Index tool by typing Performance Information and Tools in your Windows Start search box & pressing [Enter].

Another important option that you'll see discussed frequently is the TRIM command. The TRIM command allows the operating system to inform the solid-state drive which data blocks (e.g. from deleted files) are no longer in use and can be wiped internally allowing the controller to ensure compatibility, endurance, and performance.
Microsoft Windows 7 (and Windows Server 2008) supports the TRIM command by default, so the only question is whether your SSD drive supports it. That's another reason why you'll need to check on the latest firmware from your SSD manufacturer. For example, Intel firmware versions prior to 2CV102HA did not support the TRIM command.
There is a lot of conflicting information on whether TRIM support requires your SATA port to run in AHCI mode, or if IDE mode also supports TRIM. Let me offer you my insights:
- The TRIM command is an actual ATA protocol command, specifically DATA SET MANAGEMENT command 0x06. If you want to read about it, please see the ATA-8 ACS-2 working draft document. Any device that speaks the ATA protocol -- such as SATA hard disks -- and supports 48-bit LBA addressing, can support the TRIM command. You can submit this command to the drive via a standard ATA CDB message and it will work. You don't need AHCI to send this command.
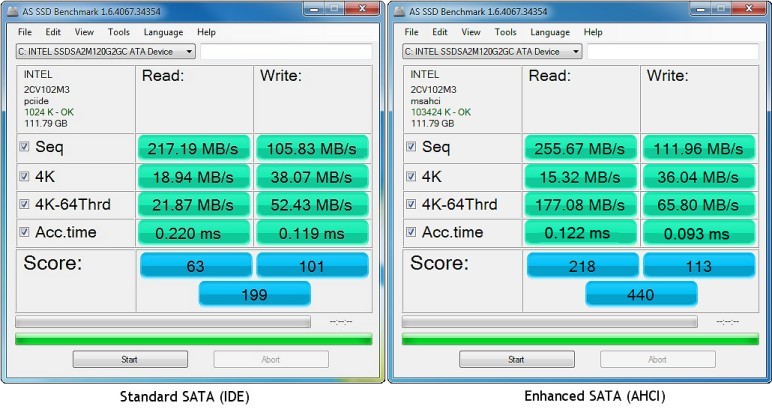
- If your system is capable of running in AHCI mode, you would definitely want to run in this mode! AHCI will add Native Command Queuing (NCQ) which will boost performance. AHCI also adds Device Initiated Power Management (DIPM) (more useful on a Laptop to increase battery life) and will give you hot-swap ability.
Just look at the difference in performance I registered by running the AS SDD benchmark in both modes. For more information on enabling AHCI after you have installed Windows without AHCI enabled, see further below under SATA - AHCI.
If you have a 2nd generation Intel SSD drive, you can download their SSD Toolbox. Besides checking & configuring Windows 7 for proper use with an SSD drive, it'll also confirm if your SSD drive supports the TRIM command. If you don't have an Intel SSD drive you can still use the SSD Toolbox to confirm if your drive will accept the TRIM command: Click the Drive Details button on the Drive Summary page, scroll down to Word 169 Data Set Management Support. If it shows 0001 it means your drive supports TRIM (Figure) 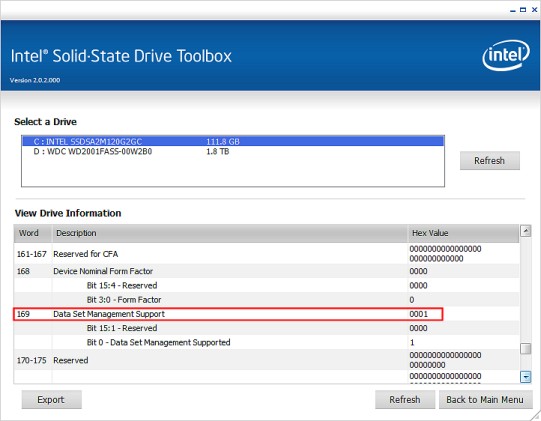 .
.
You can run a certain command in Windows 7 that will show you if TRIM support is enabled. Run this command from an elevated command prompt in Windows 7: fsutil behavior query disabledeletenotify. In this case the return DisableDeleteNotify = 0 means TRIM support is enabled in the OS (which is Windows 7 default, even on 'normal' hard disk drives).

According to Microsoft Windows 7 requests the TRIM operation for more than just file delete operations. The TRIM operation is fully integrated with partition- and volume-level commands like Format and Delete, with file system commands relating to truncate and compression, and with the System Restore (Volume Snapshot) feature.
SATA - AHCI
To further improve performance, make sure that your SATA mode is set to AHCI (Advanced Host Controller Interface) in your system's BIOS. AHCI exposes SATA's advanced capabilities - such as hot swapping and native command queuing (NCQ) - such that host systems can utilize them. Specifically the 'native command queuing' will give SSD drives a performance boost.
You should take note however: If you already have Windows 7 installed and want to change your SATA mode from (usually the standard) IDE mode to AHCI mode, you'll have to make a small change to your Windows registry, otherwise your system will refuse to start Windows.
Open the registry editor, and select the following key: HKEY_LOCAL_MACHINE\SYSTEM\CurrentControlSet\services\msahci
Right click the value Start, select Modify and change the Value data to 0.
Now restart your system, enter your BIOS and change your SATA mode to AHCI. When you restart and Windows loads, it will load the AHCI driver & asks you to reboot your system.
Windows 8
For Windows 8 you'll have to follow a different procedure. First we'll have to set Windows 8 to boot into Safe Mode. Open an elevated command prompt (type CMD on Windows 8 Start screen, right-click the Command Prompt app and click Run as administrator from the menu (Figure)  ) and type the following command bcdedit /set {current} safeboot minimal and press [Enter] on your keyboard.
Restart your system, enter your BIOS and change your SATA mode to AHCI. After saving the BIOS changes, restart your system. Windows 8 will boot in SafeMode. Open an elevated command prompt and run the following command to remove the SafeMode boot option: bcdedit /deletevalue {current} safeboot. Restart the computer and boot normally, you should now be running in AHCI mode.
Below you'll see the results of a benchmark I took using AS SDD Benchmark tool.