
Windows 7: Automatically Attach VHD Images
By: Arie SlobWindows 7 users can create virtual hard drive (VHD) images using the Disk Management tool. These images can then be mounted and used like any other partition in the operating system. A newly created image gets automatically attached in the current Windows session. The problem is that when Windows is restarted, the image is no longer attached, so after each reboot you'd have to manually attach the image before you can continue using it.
Below I'll walk you through the process of creating an image and having it automatically attached each time the system is restated.
Creating a VHD
- In Windows Start menu's Search Programs and files box type disk management.
- At the top of your Start menu click the listed Create and format hard disk partitions. (Figure)
- In Disk Management select Action > Create VHD. (Figure)
- Click the Browse button and locate a suitable place for your VHD. By default this will be in the Documents Library. For simplicity I've placed mine in the root of my C drive. You'll have to specify a File name, then click Save.
- Next you'll have to specify a size for the virtual hard disk. From the drop down menu you can select MB, GB or TB. In the example I created a 5GB drive.
- As recommended, use a fixed size drive and then click OK.
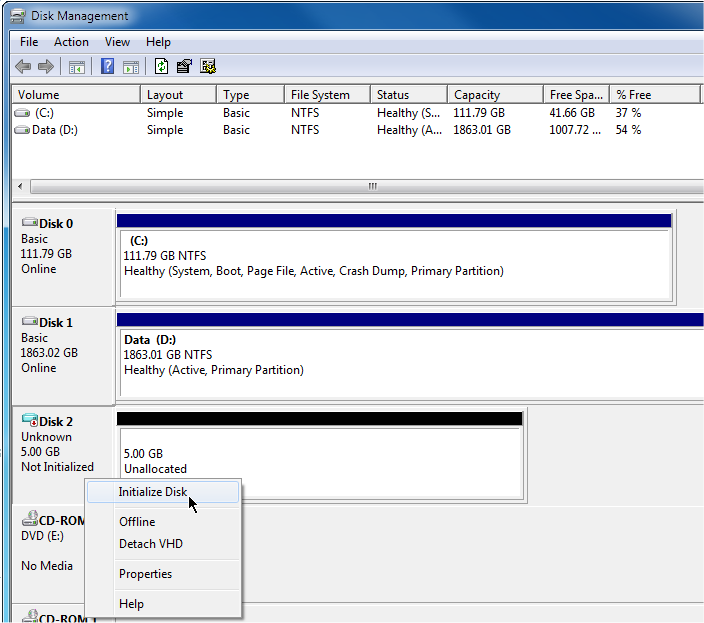
- Once the drive is created it will show as an Unknown Disk in Disk Manager. Right-click the Tile listing the Unknown disk, and from the menu select Initialize Disk (Figure). Most users will want to use the default partition style of MBR.
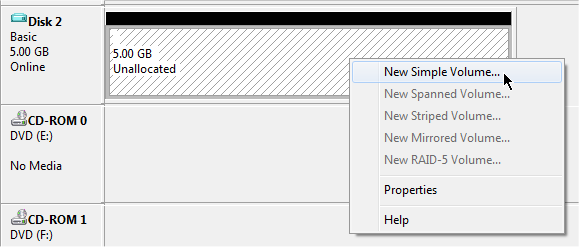
- After the drive has been initialized, right-click the unallocated space and select New Simple Volume from the menu (Figure). Choose a drive letter (or leave the suggested), have the drive NTFS formatted and enter a Volume Label. Click finish to have the process completed.
At this time you'll have a virtual hard disk that is attached. This means the drive is fully accessible in Windows. Now if you restart your computer you will notice this hard disk no longer shows in Windows Explorer or any other disk management tools. You'd have to start Disk Management, choose Action > Attach VHD from the menu, browse to the location of the VHD file, select it to have it re-attached to Windows. Let's automate this.
Using DiskPart to Attach VHD
We start by creating a 'script' file we will be feeding to DiskPart. I created a folder \Scripts in the root of my C drive for this purpose; you can chose to place these files anywhere you want.
- Using Windows Explorer, right-click an empty space in the \Scripts folder and from the menu choose New > Text Document.
- Name the new file drives.txt and open it in Notepad.
- For each VHD you want to attach, enter the following two lines:
In my example:
- select vdisk file="path and name of VHD"
- attach vdisk
- select vdisk file="c:\Test.vhd"
- attach vdisk
- Save the file and close.
Next we'll create the DiskPart command:
- Using Windows Explorer, right-click an empty space in the \Scripts folder and from the menu choose New > Text Document.
- Name the new file AttachVHD.txt and open it in Notepad.
- Enter diskpart /s c:\Scripts\drives.txt as the only content.
- Save the file and close.
- Right-click the AttachVHD.txt file, select Properties and change the extension from .txt to .cmd. Click OK and confirm (Yes) that you want to change the file name extension.
We could now move the AttachVHD.cmd file to the startup folder, but we would receive a User Account Control prompt on each boot, so we'll use the information from my other article Bypass UAC Prompt For Specific Application to get around this.
Using TaskScheduler to Bypass UAC Prompt
- Type Task Scheduler in the search box on your Start menu, and press [Enter].
- Click the Create Task link under Actions in the right panel.
- Type a name for the task (AttachDisk) and click the check-box Run with highest privileges. Leave everything else as default.
- Select the Actions tab and click the New button.
- Browse to the program in the Program/script box by clicking the Browse... button. When you find your program (in this case browse & select C:\Scripts\AttachVHD.cmd, select it and click the OK button two times.
- You can now close Task Scheduler.
- Right click an empty space on your Desktop and from the menu choose New > Shortcut.
- In the Create Shortcut window type schtasks.exe /run /tn AttachDisk (AttachDisk is the name you gave your task) and click Next.
- Type a name for the shortcut (I used AttachVHD) and click Finish.
- Right-click the shortcut you just created and from the menu click Cut.
- In Windows Explorer navigate to \ProgramData \ Microsoft \ Windows \ Start Menu \ Programs \ Startup. Please note that the ProgramData is a hidden directory on your hard drive, so you'll have to set Windows Explorer's Folder Options to Show hidden files, folders, and drives.
- Right-click an empty space in the Startup folder and from the menu choose Paste. Click Continue at the Access Denied (UAC) message and note that the AttachVHD shortcut is now placed in the Startup folder.
That's all! Each time Windows restarts your VHD will be attached (mounted).